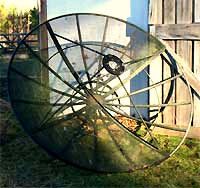
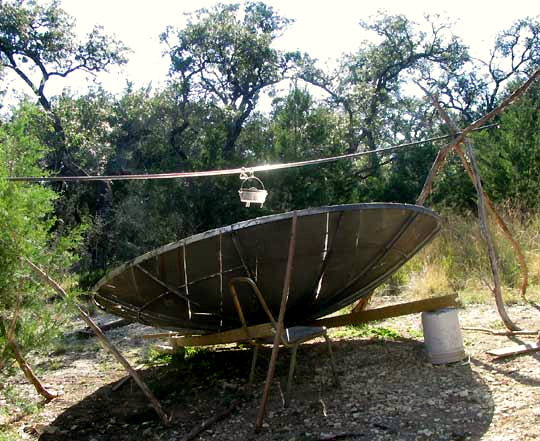
 In many parts of the world outdated, abandoned satellite dishes such as the eight-foot-across (2.4 m) one at the right clutter the landscape. These dishes are a valuable resource.
In early 2004 a neighbor in southwestern Mississippi gave us the dish at the right. We removed the signal-collecting apparatus suspended at the focal point in the center of the dish, and the metal webbing between the ribs. Then we were ready to start adding things.
For $27.50 a 50-ft x 20-inch roll of aluminum flashing was purchased from the local hardware store. After carefully measuring the spaces between the satellite-dish's ribs, with tin-snips, 16 triangular aluminum wedges were cut out. The dish was factory-made with each of its ribs having slots along their sides for their entire lengths, so the triangular wedges slipped into these slots.
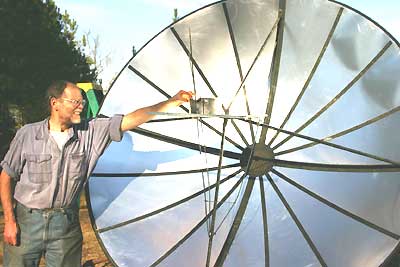
However, two friends were needed to help with this because things buckled, didn't fit, bent slots needed prying apart,etc. It took about half a day to do the whole thing, with the most time-consuming and difficult part being positioning the wedges. At the left you see how a pot-holding platform was built where cooking took place at the dish's focal point.
The platform consisted of an upside-down, metal-wire frame used by florists to hold large, standing flower arrangements in place. Then an aluminum tray salvaged from an abandoned refrigerator was attached to that frame, with metal clamps.
The resulting creation boiled water, fried eggs in a skillet in ten minutes, and baked a perfect skillet of cornbread in less than half an hour. Total cost: $27.50. The flower stand and clamps were on hand.
WARNING: This is a powerful apparatus. It can damage eyes, and can cause painful burns. Notice how I'm grimacing in the above picture. If you should accidentally put your face at the light's focal point, your vision might be impaired permanently!
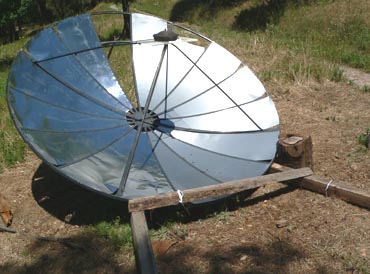
In 2005 I found myself in California's Sierra Nevada foothills, where a second, larger dish was made, this one at the right. Here the ground was too rocky for placing a pole for the dish to be fixed to, so a wooden platform was devised. Propping up the dish from behind with a forked stick, the dish could be manhandled enough to follow the sun for several hours. Note the white rope with which the dish's lower rim is tied to the frame's crossbar, and the heavy log section at the right. These kept the dish from rolling off.
Two rolls of aluminum were used, costing about $40. Unfortunately, when the rolls were undone, one roll had thin, highly reflective sheeting, while the second roll's sheeting was much firmer but powdery-surfaced. The thin sheeting was good because of its reflectivity, but it tended to crinkle and warp so that the surface ended up bumpy, causing a more diffuse focal spot. The powdery surface also diffused light, but the firmer sheeting didn't wrinkle, so focused better. It's unclear which kind of sheeting was most efficient. Also, I simply couldn't position the last panel in place, at least not with the thin, curling aluminum, so this cooker had an empty place at the top.
This second cooker cooked as well if not better than the first one. Probably it was a less efficient reflector, but its larger surface compensated. This time, instead of regularly changing the dish's position to keep the light focused on the skillet as the Sun moved across the sky, I learned to place the skillet, at around 10:30 AM, where the focus point would pass the skillet later, and then not touch it until noon, when the meal was perfectly cooked.
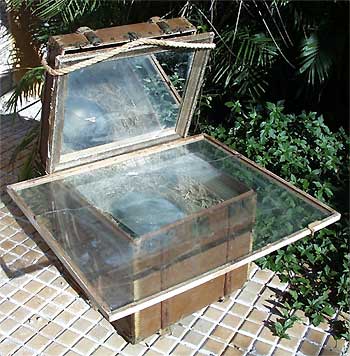
In 2006 I'd moved to Yucatán, Mexico where a solar cooker of a completely different design was needed, for no one in that area was throwing away satellite dishes, or hardly anything that could be used at all. You can see what resulted at the left. Such things as decent screws and screwdrivers were out of the question so this was a jointless invention.
This "double cooker" design consisted of a smaller container inside a larger box, with both the larger box and the smaller container topped with different-sized plates of glass. Cooking was done in the inner container. The inner container was a stainless-steel pot resting in dry straw. The straw provided insulation. The greenhouse effect caused heat to accumulate in both the inner container and the larger box, since both had glass tops. The outer box got rather hot inside, which decreased the temperature gradient between the inner cooking chamber and the outside air. The outer box's hot air, then, compensated for the lack of good insulation and tightly fitting components.
Note the mirror at the top, reflecting sunlight into the box. If more mirrors had been available they'd have mounted at the sides, since the more radiant energy that entered the box, the better.
This system fried eggs and baked bread, but didn't get hot enough to cook potatoes or carrots. It was great for baking bananas, which tasted as sweet as those baked in the embers of a campfire.
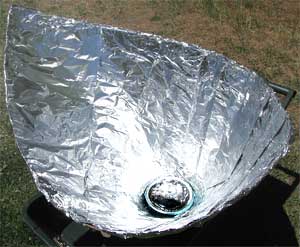
In 2007 I lived in the north-central Mexican state of Querétaro, volunteering at the offices of the Sierra Gorda Biosphere Reserve in Jalpan. This was in an arid, scrubby valley and one thing the Reserve did was to encourage the use of solar ovens in surrounding villages. As such they sold solar-oven kits. One kit was made of highly reflective metal sheets and sold for about $40 US. The other was of cardboard surfaced with what appeared to be aluminum foil, and it cost about $30 US.
When I saw the limited reflective surface area offered by the kits I didn't have much hope that they'd be any good. However, they worked, even the cardboard one, which was used for nearly a year. At the end of that year, however, despite having treated it very delicately, it was getting ragged and falling apart. At the right you can see it when it was new.
The secret to the kit's success was the double bowls that came with the kit. The outside bowl and lid were of clear glass, but the inner bowl, which sat so that a thin air space existed between it and the outer one, was black. Heat built up in this two-bowl system wonderfully, and it cooked great stews and, especially, rice-and-raisin pudding.
In 2009 I spent most of the year, the warmer months, in Oregon. Summers there were very dry and the fire hazard was great, so a solar oven was needed. I'd never built an oven this far north and wasn't sure it'd work. I shouldn't have worried.
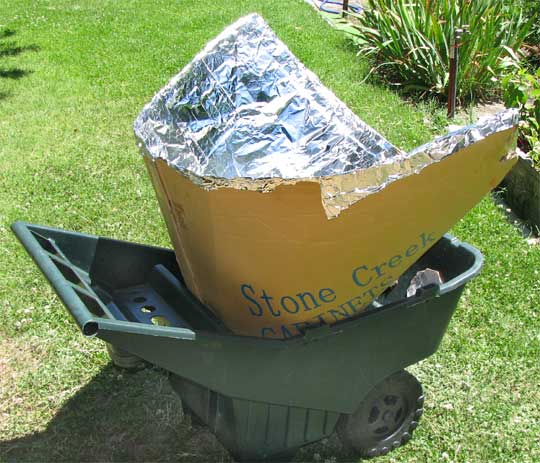
This time a Solar Funnel Cooker was built, the design of which was found at www.solarcooking.org. The result is shown at the left.
The instructions called for a sheet of cardboard measuring 2 x 4 feet but I used 3 x 6. They advised gluing the aluminum foil in place but I stapled mine with a simple office stapler. Their design called for painting a canning jar black and putting it inside a plastic bag, then cooking what was in the black jar. I had access to a clear-glass pan and top large enough to enclose a small skillet with its handle removed, and used that. The blackened top of an old pot just happened to fit the skillet. The skillet and pan top both were blackened with woodsmoke.
As with the last kit profiled above, the real secret here was having a black container inside a clear-glass one, and cooking what's put in the black container. The final product is shown at the right.
This worked just as well as the solar-oven kit profiled above. Since everything except the aluminum foil was basically found junk, this cooker cost maybe $2 worth of foil and took about two hours to put together. It baked bread, fried eggs, simmered stews -- covered all the basics. A skillet-sized biscuit made of whole-wheat flour took about an hour to bake to perfection
In 2013 I'd turned up in hot, sunny southwestern Texas on the southern slope of the Edwards Plateau, between San Antonio and the Mexican border at Del Rio. Once again a neighbor contributed an abandoned satellite dish.
This was different from previous satellite dishes. It was a big one, like the one in California, but this one's metal webbing covering the radiating ribs was intact. I thought that this was great, for now I could just "sew" long sheets of aluminum sheeting onto the webbing, instead of fitting cut triangles. Above you can see how the strips were sewed on with snippets of copper wire.
I wouldn't sew the sheeting to the webbing like that if I were to begin over again. The webbing was a little warped here and there. More important, despite efforts to conform the curvature of the aluminum sheets with that of the dish, sometimes the sewing caused the sheets to warp so that reflected sunlight was directed away from the desired focal point. It would have been better to attach small squares maybe two feet across. Staple them in the center, to a rib if possible, and not to the webbing, and let the squares' sides conform to the dish below them.
Spacing was allowed between the sheets to let breezes pass through, because dishes this size can easily kite away during storms. Also different with this dish is that the pot was suspended from a pole held in place by tripods. This worked well for a pot, but I prefered cooking with a skillet and liked my previous designs better.
So, after all my good luck with previous efforts, this one turned out less than perfect. However, like the others, it was so large that even with all its imperfections and inefficiencies, it cooked just fine, and made wonderful cornbread and stews.
In 2018 I was back in central Yucatán state, Mexico, on a little rancho in the woods, without electricity or wifi. I had plenty of firewood, but still hankered to cook things with sunlight.
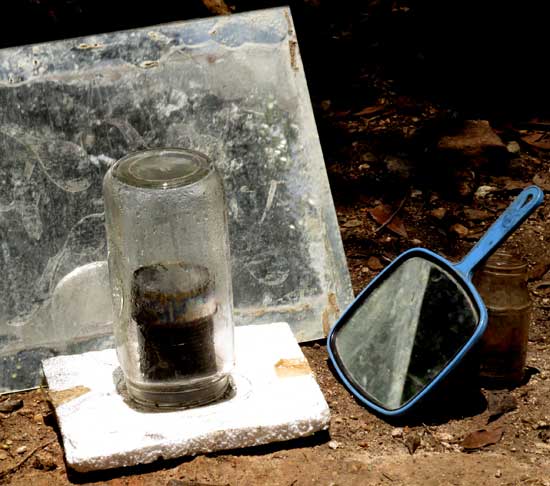
With my vegetarian diet, I'm concerned about getting enough protein. Over the years I've found that if I eat two eggs each and every day, protein is no problem. Therefore, my first solar cooker effort here was one for providing hard eggs. I don't say "hard-boiled eggs," the usual English expression, because this new effort didn't boil them. However, an egg doesn't have to be boiled to turn hard. What you see is a hard-egg cooker, made purely from Mexican junk.
Two Muscovy Duck eggs reside inside the black tin can inside the upside-down jar. The tin can is open at the top, so atop it, serving as a cap, is a slightly larger, shallow can, turned upside-down. The cans originally weren't black enough, so they had to be blackened to absorb the sunlight. They were smeared with very thin layers of petroleum jelly and soot from the bottom of a campfire skillet was applied.
The glass jar over the cans is necessary for taking advantage of the greenhouse effect. The black cans absorb sunlight, heat up not only the large can's contents, but also the air around them, and the glass jar keeps that hot air from escaping. Air inside the jar just keeps getting hotter and hotter, making it easier for the can's contents to get even hotter. Everything sits atop a sheet of Styrofoam, which is a good insulator keeping heat from draining into the ground.
The big mirror, being junked, didn't reflect very well, but it did enough. The hand mirror was a good reflector, but needed to be larger. However, the system produced hard eggs. At first I'd put the eggs in water inside the tin can, because I'd always boiled eggs in water. However, when I thought about it, I did away with the water and the eggs seemed to cook even better. With such inefficient mirrors and partly cloudy skies, it took about five hours to produce hard eggs.
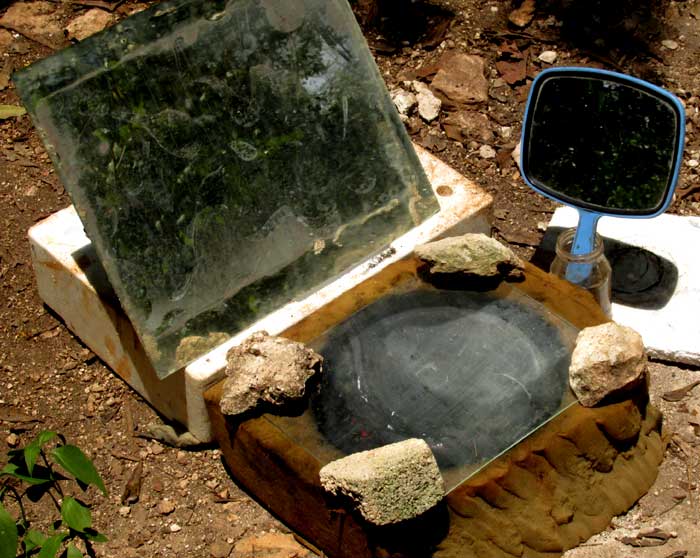
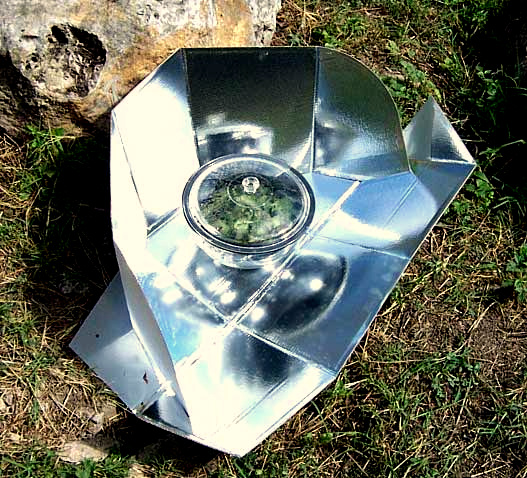
Once the above cooker was functioning OK I found some junk foam rubber from a discarded mattress and -- since soot-blackened cans are messy to deal with, and I prefer fried eggs to hard ones -- developed another cooker for my handleless skillet, shown at the left.
Skillets with their handles broken off are common features of Mexican junkpiles, so this second design used two of them. One was sunk deeply into the foam rubber, and the other, of the same diameter, was turned upside-down atop it, serving as a top. In the lower skillet, eggs were fried. In two or three hours they were ready, so this system was more efficient than the other, and it's the one used habitually, except on cloudy days.
The transparent covering keeping heat around the skillets (weighted down by four stones) was the weak point, because instead of clear glass all I could find was a sheet of Plexiglas that fogged, reflected back too much sunlight, and warped with too much heat. Large sheets of glass, even broken-off ones, were of value in this area and didn't turn up in junkpiles. Anyway, the system as it was did its job of frying eggs.
You might enjoy browsing these websites: Plans for Solar Cookers; Solar Cooking International; Solar Cooking Atlas in Europe.